 Bill Dilworth admits that "cutting-edge," when he was in high school, was "two teletype machines with an acoustic modem link to the University of Delaware's mainframe." Anyone remember yellow punch tape?
Bill's mostly picked up PowerPoint on his own, doing occasional presentations at work and helping co-workers solve their computer problems. But he really hit his stride when his wife volunteered him for the post of Tech Team Leader at their church, where he's applied his PowerPoint and theatrical knowledge to the fullest.
Visit Bill's site here.
Creating a pendulum swing animation is possible using PowerPoint 2002 or later, and involves creating a hidden pivot point. A pendulum (the real type) swings back and forth on a pivot point at the top of the weight's string, so we will need to create a shape that appears to swing at the end of a string and repeats back and forth from this pivot point. Here are the steps:
You can download the sample presentation here (around 4 kb).
- Create a new presentation (Ctrl + N) and insert a blank slide. Or insert a blank slide in an existing presentation.
- Choose the line tool in the Drawing toolbar and create a standing line from the pivot point to the weight in its far bottom, as shown in Figure 1, below. Start drawing from the center of the slide, and hold the Shift key while dragging and drawing the line so that you end with a perfect, straight line.

Figure 1: A standing line created- Double-click the line, or select the line and choose Format | AutoShape. Either way you'll get to the Format AutoShape dialog box. Within the Size tab, change the Rotation value to 22.5°, as shown in Figure 2, below. Click the OK button to exit the dialog box.
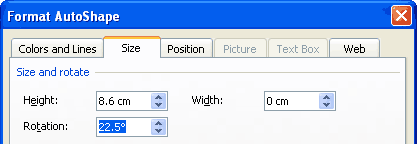
Figure 2: Rotation value changed- Draw a circle beneath the line and change the line thickness and color for both the line and circle as required. Select both the line and the circle and right-click the selection, in the fly-out menu choose Grouping | Group.
- Your slide should have a pendulum swinging towards the left, as shown in Figure 3, below.
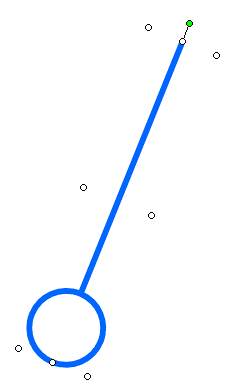
Figure 3: Pendulum swinging towards the left- Select the pendulum and duplicate it (Ctrl + D). Now select the duplicated pendulum and choose Draw (in the Drawing toolbar) | Rotate or Flip | Rotate Left 90°, as shown in Figure 4, below. Do this again to attain a rotation of 180°.
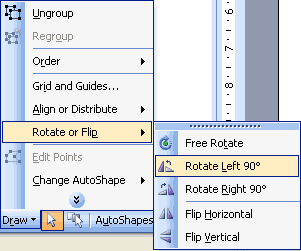
Figure 4: Rotate Left 90° option to be selected- You'll now have two pendulums with their weights in opposite directions. Drag the duplicated pendulum to that both the lines join to form a single line, as shown in Figure 5, below.

Figure 5: Two pendulams joined to form a single line- Select the top pendulum and click the arrow next to the Line Color icon in the Drawing toolbar to open a fly-out menu. Next, choose the More Line Colors option in the menu to summon the Colors dialog box, as shown in Figure 6, below. Drag the Transparency slider in the dialog box until 99%. Click the OK button to get back to the slide.
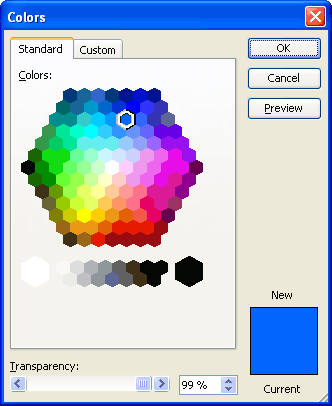
Figure 6: Transparency changed to 99%- Make sure that both the pendulums are selected (two lines and two circles) and group them by right-clicking and choosing Grouping | Group in the right-click menu. Since the second pendulum is now essentially 99% transparent, you'll only be able to see a very faint representation of that element on the slide.
- With the group selected, choose Slide Show | Custom Animation to activate the Custom Animation Task Pane. In the task pane, choose Add Effect | Empahsis | Spin. If the Spin option is not available, choose Add Effect | Emphasis | More Effects | Basic | Spin.
- Now, select the animation in the animation list and click the downward pointing arrow next to the listing to reveal a fly-out menu, as shown in Figure 7, below.
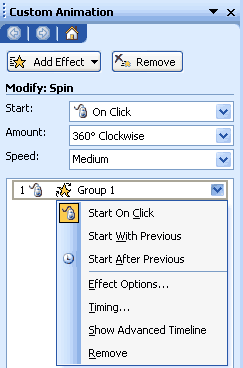
Figure 7: Animation selected within the Custom Animation Task Pane- Select Effect Option to bring up the tabbed dialog box, as shown in Figure 8, below. In the Effect tab, place a check mark next to Smooth start, Smooth end, and Auto-reverse options.
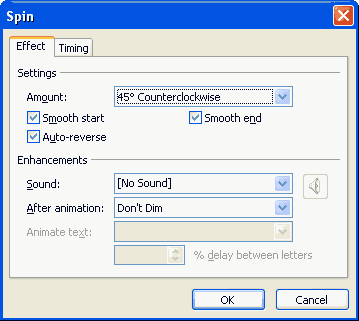
Figure 8: Effect settings changed- In the Amount dropdown list, choose the Custom: option and type 45°. Also choose the Counterclockwise option, as shown in Figure 9, below.
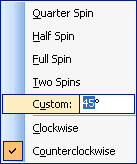
Figure 9: Amount dropdown list- In the Timing tab, as shown in Figure 10, below, change Start to With Previous, make sure Speed is set to Medium, and Repeat is set to Until End of Slide.
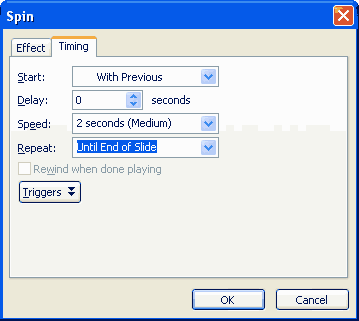
Figure 10: Changes made to the Timing options- Click the OK button to get back to the slide.
- You can now scale the pendulum size to become larger, even if the top area of the pendulum (that is 99% transparent) goes above the slide area.
- Preview and save your presentation.
 Bill Dilworth admits that "cutting-edge," when he was in high school, was "two teletype machines with an acoustic modem link to the University of Delaware's mainframe." Anyone remember yellow punch tape?


